1607 lines
38 KiB
Markdown
Executable File
1607 lines
38 KiB
Markdown
Executable File
# react
|
||
|
||
> 类似 vue 的全家桶: vite+react+zustand+swr
|
||
|
||
> **"Hook"可以被理解为一种设计模式或机制,它允许函数或模块之间以一种更加动态和灵活的方式进行交互**。具体来说,Hook 通常指的是一个函数,该函数可以在不修改原始代码的情况下扩展或改变某些行为
|
||
> `ref` 和 `reactive` 是 Vue 的"Hook"
|
||
|
||
> React: 状态不可变, vue 的状态是可变的
|
||
|
||
> 函数式编程: 1. 相同的输入总是得到相同的输出 2. 没有副作用(不修改外部状态,如全局变量、DOM 等)
|
||
|
||
## 简介
|
||
|
||
> FaceBook 开源的一个构建用户界面的 JavaScript 库
|
||
|
||
[官网](https://zh-hans.reactjs.org/)
|
||
|
||
[官方教程](https://zh-hans.reactjs.org/docs/getting-started.html)
|
||
|
||
## 核心库
|
||
|
||
* react: 核心库
|
||
* react-dom: DOM 操作库, 开发 web 应用
|
||
|
||
拆开原因: 像 react-navie 只需要核心库
|
||
|
||
babel.min.js 的作用:
|
||
|
||
* 把 es6 转 es5
|
||
* jsx 转 js
|
||
|
||
## vscode 插件
|
||
|
||
`ES7+ React/Redux/React-Native snippets` :
|
||
|
||
```jsx
|
||
// 快捷键rafce
|
||
import React from 'react'
|
||
|
||
const $1 = () => {
|
||
return <div>$0</div>
|
||
}
|
||
|
||
export default $1
|
||
```
|
||
|
||
[vscode-react-javascript-snippets/Snippets.md](https://github.com/ults-io/vscode-react-javascript-snippets/blob/HEAD/docs/Snippets.md)
|
||
|
||
`VSCode React Refactor`
|
||
|
||
vscode 编辑器 react 代码中开启 emmet 提示:
|
||
|
||
`设置搜索 emmet => 找到 Emmet:Include Languages => 添加项 javascript 值 javascriptreact`
|
||
|
||
## hello React
|
||
|
||
React 18:
|
||
|
||
```markdown
|
||
三个API
|
||
1. React.createElement(type, [props], [...children])
|
||
用来创建React元素
|
||
参数:
|
||
1.1 元素名, html标签必须小写
|
||
1.2 元素中的属性
|
||
1.2.1 设置事件时, 属性名需要小驼峰
|
||
1.2.2 class要改为className
|
||
1.3. 元素中的子元素(内容)
|
||
2. React.createRoot(container[, options])
|
||
用来创建React的根容器, 容器用来放置React元素
|
||
3. root.render(element)
|
||
3.1 首次调用的时候, 容器节点里的所有DOM元素都会被替代, 后续调用会使用diff算法进行更新
|
||
3.2 **React元素创建后无法修改, 只能通过创建新的元素进行替换(实际会调用diff算法, 只更新变化的部分)**
|
||
```
|
||
|
||
```html
|
||
<!DOCTYPE html>
|
||
<html lang="en">
|
||
<head>
|
||
<meta charset="UTF-8" />
|
||
<meta http-equiv="X-UA-Compatible" content="IE=edge" />
|
||
<meta name="viewport" content="width=device-width, initial-scale=1.0" />
|
||
<title>Document</title>
|
||
<script src="https://unpkg.com/react@18/umd/react.development.js" crossorigin></script>
|
||
<script src="https://unpkg.com/react-dom@18/umd/react-dom.development.js" crossorigin></script>
|
||
</head>
|
||
<body>
|
||
<div id="root"></div>
|
||
</body>
|
||
<script>
|
||
// 1. React.createElement 创建React元素
|
||
const button = React.createElement(
|
||
'button',
|
||
{
|
||
id: 'btn',
|
||
type: 'button',
|
||
className: 'hello',
|
||
onClick: () => alert(123),
|
||
},
|
||
'react创建的按钮'
|
||
)
|
||
|
||
// 2. ReactDOM.createRoot 创建React根元素, 需要提供一个DOM元素作为参数
|
||
const root = ReactDOM.createRoot(document.getElementById('root'))
|
||
|
||
// 3. root.render() 将React元素渲染到根元素中
|
||
root.render(button)
|
||
</script>
|
||
</html>
|
||
```
|
||
|
||
通过`React.createElement`创建元素很麻烦, 引入`JSX` (React.createElement 的语法糖)
|
||
|
||
```jsx
|
||
<!DOCTYPE html>
|
||
<html lang="en">
|
||
<head>
|
||
<meta charset="UTF-8" />
|
||
<meta http-equiv="X-UA-Compatible" content="IE=edge" />
|
||
<meta name="viewport" content="width=device-width, initial-scale=1.0" />
|
||
<title>Document</title>
|
||
<script src="./js/react.development.js"></script>
|
||
<script src="./js/react-dom.development.js"></script>
|
||
<script src="./js/babel.min.js"></script>
|
||
</head>
|
||
<body>
|
||
<div id="root"></div>
|
||
</body>
|
||
<script type="text/babel">
|
||
// 1. JSX 会被babel翻译成React语法
|
||
const button = (
|
||
<div>
|
||
<button id="btn" type="button" className="hello" onClick={() => alert(123)}>
|
||
按钮
|
||
</button>
|
||
</div>
|
||
)
|
||
|
||
// 2. ReactDOM.createRoot 创建React根元素, 需要提供一个DOM元素作为参数
|
||
const root = ReactDOM.createRoot(document.getElementById('root'))
|
||
|
||
// 3. root.render() 将React元素渲染到根元素中
|
||
root.render(button)
|
||
</script>
|
||
</html>
|
||
```
|
||
|
||
React 17->18 的`api`发生了变化, `ReactDOM.render(vm, container)`替换成 `ReactDOM.createRoot(container[, options])` + `root.render(element)`
|
||
|
||
React 17:
|
||
|
||
```markdown
|
||
1. 准备一个用来挂载容器的标签
|
||
2. 引入核心库
|
||
3. 引入DOM操作库
|
||
4. 引入babel
|
||
5. 创建虚拟DOM
|
||
6. 把虚拟DOM渲染成真实DOM并挂载到容器, ReactDOM.render(vm, container)
|
||
```
|
||
|
||
```html
|
||
<!DOCTYPE html>
|
||
<html lang="en">
|
||
<head>
|
||
<meta charset="UTF-8" />
|
||
<meta http-equiv="X-UA-Compatible" content="IE=edge" />
|
||
<meta name="viewport" content="width=device-width, initial-scale=1.0" />
|
||
<title>Document</title>
|
||
</head>
|
||
<body>
|
||
<!-- 准备一个用来挂载容器的标签 -->
|
||
<div id="test"></div>
|
||
|
||
<!-- 引入react库有顺序要求 -->
|
||
<!-- 1. 引入核心库 -->
|
||
<script type="text/javascript" src="./js/react.development.js"></script>
|
||
|
||
<!-- 2. 引入DOM操作库 -->
|
||
<script type="text/javascript" src="./js/react-DOM.development.js"></script>
|
||
|
||
<!-- 3. 引入babel -->
|
||
<script type="text/javascript" src="./js/babel.min.js"></script>
|
||
|
||
<!-- 4. 编写jsx -->
|
||
<!-- type类型必须是text/babel, 不是javascript -->
|
||
<script type="text/babel">
|
||
// 4.1 创建虚拟DOM
|
||
const vm = <h1>hello react</h1>
|
||
console.log('vm', vm)
|
||
/**
|
||
关于虚拟DOM
|
||
1. 本质是Object类型的对象
|
||
2. 虚拟Dom的属性远比真实Dom少
|
||
3. 虚拟Dom最终被React转化为真实Dom挂载到页面上
|
||
*/
|
||
|
||
// 4.2 挂载DOM到页面
|
||
ReactDOM.render(vm, document.getElementById('test'))
|
||
</script>
|
||
</body>
|
||
</html>
|
||
```
|
||
|
||
## creat-react-app
|
||
|
||
```sh
|
||
# npm
|
||
npx create-react-app react-app
|
||
# pnpm
|
||
pnpm dlx create-react-app react-app
|
||
```
|
||
|
||
设置默认打开浏览器:修改 'package.json'
|
||
|
||
```json
|
||
"scripts": {
|
||
"start": "BROWSER='Google Chrome Beta' react-scripts start",
|
||
},
|
||
```
|
||
|
||
备注: 使用的是 webpack
|
||
|
||
## vite
|
||
|
||
```sh
|
||
# pnpm
|
||
pnpm create vite
|
||
# 然后选择配置
|
||
# 或者直接指定
|
||
pnpm create vite my-react-app --template react
|
||
```
|
||
|
||
## JSX
|
||
|
||
> JavaScript XML, 是一个 JS 的拓展, 需要通过 babel 转化成浏览器能执行的 js 代码
|
||
|
||
* xml 是早期用来存储数据的(效率不高, 改用 Json)
|
||
|
||
```xml
|
||
<student>
|
||
<name>jack</name>
|
||
<age>18</age>
|
||
</student>
|
||
```
|
||
|
||
```json
|
||
"{"student":{"name":"jack", "age":18}}"
|
||
```
|
||
|
||
语法:
|
||
|
||
* 定义虚拟 dom 时不要用引号
|
||
* 标签中混入 js 的表达式时, 用`{}`
|
||
* 样式的类名不能用 class , 要用`className`
|
||
* 内联样式要用 `style={\{ key: value \}}` 的方式, 第一个花括号表示里面是 js 表达式, 第二个花括号表示是对象
|
||
* 虚拟 dom 只能有根标签
|
||
* 标签必须闭合
|
||
* 标签的首字母大小写
|
||
* 小写, 先识别成 html 中的同名标签
|
||
* 大写, 识别成 React 的组件
|
||
* jsx 循环渲染
|
||
* `{ 数组变量.map( item=>( <标签>{item}</标签> ) ) }`
|
||
* map()的箭头函数的方法用小括号包括 jsx, 使用{}会报错
|
||
* map()循环生成的元素一定要加上 key
|
||
* jsx 条件渲染
|
||
* 用三元表达式
|
||
|
||
```js
|
||
<script type="text/babel">
|
||
// 4.1 创建虚拟DOM const title = '前端js框架' const list = ['Angular', 'React', 'Vue'] const vm ={' '}
|
||
<div>
|
||
<div style={{ fontSize: 30 + 'px' }}>{title}</div>
|
||
{list.map((item, index) => {
|
||
return <li key={index}>{item}</li>
|
||
})}
|
||
</div>
|
||
// 4.2 挂载DOM到页面 ReactDOM.render(vm, document.getElementById('test'))
|
||
</script>
|
||
```
|
||
|
||
* 写注释`{/* jsx里面的注释 */}`
|
||
|
||
## 组件
|
||
|
||
react 中组件有两种创建方式:
|
||
|
||
一: 函数式组件: 函数返回一个`jsx`, 函数首字母必须`大写`
|
||
|
||
二: 类组件: 类组件必须继承 `React.Component`, 类组件中, 必须添加一个`render()`方法, 且方法的返回值是`jsx`
|
||
|
||
```js
|
||
// 函数组件
|
||
const App = () => {
|
||
return <div>jsx</div>
|
||
}
|
||
|
||
export default App
|
||
```
|
||
|
||
```js
|
||
// 类组件
|
||
import React from 'React'
|
||
|
||
class App extends React.Component {
|
||
render() {
|
||
return <div>jsx</div>
|
||
}
|
||
}
|
||
|
||
export default App
|
||
```
|
||
|
||
## 事件
|
||
|
||
```js
|
||
const clickHandler = event => {
|
||
alert('我是提示')
|
||
console.log(event)
|
||
// 取消默认行为
|
||
event.preventDefault()
|
||
// 阻止冒泡
|
||
event.stopPropagation()
|
||
}
|
||
|
||
const MyButton = () => {
|
||
return <button onClick={clickHandler}>点我弹窗</button>
|
||
}
|
||
|
||
export default MyButton
|
||
```
|
||
|
||
* 事件用小驼峰
|
||
* react 中, 无法通过 return false 取消默认行为
|
||
* react 事件中可以在相应函数中定义参数来接受事件对象, 事件对象是经过 react 包装过的, 不是原生的事件对象
|
||
* 取消默认行为: `event.preventDefault()`
|
||
* 阻止冒泡`event.stopPropagation()`
|
||
|
||
## props: 父传子
|
||
|
||
* 父组件通过`props`传递参数给子组件
|
||
* 子组件通过形参接收父组件传来的所有参数
|
||
* **props**是只读的,不能修改
|
||
|
||
```js
|
||
/**
|
||
父组件中:通过属性传递
|
||
*/
|
||
<Child data1={Data1} data2={Data2}><Child/>
|
||
|
||
/**
|
||
子组件中:通过props接收
|
||
*/
|
||
const Child = (props)=>{
|
||
const {data1, data2} = props
|
||
return <div><div/>
|
||
}
|
||
|
||
export default Clild;
|
||
```
|
||
|
||
## useState
|
||
|
||
> * 在 React 中, 组件渲染完毕后, 再修改组件中的数据, 不会触发重新渲染
|
||
>
|
||
> * React 提供特殊变量 state, 改变后触发渲染(渲染前也会进行 diff)
|
||
>
|
||
> * 用 setState 改变 state, 改变的不是当前的 state,而是下次渲染的 state
|
||
>
|
||
> * 渲染是异步的,会进入队列,最终进行合并
|
||
>
|
||
> * 当用 setState 需要用到旧 state 时, 有可能出现计算错误的情况(举例: 点击按钮,每次都是旧 state 加 1. 快速点两下,state 只加 1)
|
||
>
|
||
> 为了解决这种问题,给 setState 传入回调函数,回调函数接收旧的 state, 返回值将成为新的 state
|
||
|
||
```js
|
||
import { useState } from 'react'
|
||
import './App.css'
|
||
|
||
const App = () => {
|
||
const data = useState(1) // 传一个初始值,可以是常数或者数组等
|
||
console.log('data', data)
|
||
// 返回一个数组,第一个是初始值, 第二个是函数
|
||
// 初始值只是用来显示的, 改变不会触发渲染
|
||
// 函数通常命名为setXxx,参数为新的值
|
||
const [value, setData] = data
|
||
const dataChange = () => {
|
||
setData(value + 1)
|
||
}
|
||
|
||
const [userInfo, updateUserInfo] = useState({ name: '小明', age: 10 })
|
||
console.log('userInfo', userInfo)
|
||
const updateUserInfoHandler = () => {
|
||
updateUserInfo({ name: '小红' })
|
||
}
|
||
// 发现年龄没了
|
||
// 当state是对象时, setState是用新的对象替换旧的对象
|
||
|
||
const updateUserInfoHandler2 = () => {
|
||
updateUserInfo({ ...userInfo, name: '小红' })
|
||
}
|
||
|
||
const updateUserInfoHandler3 = () => {
|
||
userInfo.name = '小李'
|
||
updateUserInfo(userInfo)
|
||
}
|
||
// 发现没有改变名字: 因为对象还是那个内存地址, 没有变化
|
||
|
||
const updateUserInfoHandler4 = () => {
|
||
setTimeout(() => {
|
||
updateUserInfo({ ...userInfo, age: userInfo.age + 1 })
|
||
}, 1000)
|
||
}
|
||
// 手速快点, 发现数值改变发生异常. setState改变的不是当前的state
|
||
|
||
const updateUserInfoHandler5 = () => {
|
||
setTimeout(() => {
|
||
// 给setState传回调函数, 返回值将作为新的state
|
||
updateUserInfo(prev => {
|
||
return { ...prev, age: prev.age + 1 }
|
||
})
|
||
}, 1000)
|
||
}
|
||
|
||
return (
|
||
<div>
|
||
<div>{value}</div>
|
||
<button onClick={dataChange}>更改</button>
|
||
<div>
|
||
{userInfo.name}-{userInfo.age}
|
||
</div>
|
||
<button onClick={updateUserInfoHandler}>改名1</button>
|
||
<button onClick={updateUserInfoHandler2}>改名2</button>
|
||
<button onClick={updateUserInfoHandler3}>改名3</button>
|
||
<button onClick={updateUserInfoHandler4}>年龄加1</button>
|
||
<button onClick={updateUserInfoHandler5}>年龄加1</button>
|
||
</div>
|
||
)
|
||
}
|
||
|
||
export default App
|
||
```
|
||
|
||
## useRef 获取原生 dom
|
||
|
||
* React 中的钩子函数只能用于函数组件或者自定义钩子
|
||
* 钩子函数只能在函数组件中调用
|
||
|
||
1. 创建 ref 容器
|
||
2. 绑定到标签的 ref 属性
|
||
|
||
```js
|
||
import { useRef } from 'react'
|
||
import './App.css'
|
||
|
||
const App = () => {
|
||
const myRef = useRef() // 用来存放dom的容器
|
||
console.log('myRef', myRef) // 和手动创建的{current:undefined}的区别
|
||
// 手动创建的在重新渲染后都发生变化
|
||
// ureRef创建的可以确保每次渲染后都是同一个对象(生命周期内)
|
||
|
||
const clickHandler = () => {
|
||
console.log('myRef', myRef) // 存到current属性里
|
||
console.log('myRef', myRef.current)
|
||
}
|
||
|
||
return (
|
||
<div>
|
||
<div ref={myRef}>ref</div>
|
||
<button onClick={clickHandler}>按钮</button>
|
||
</div>
|
||
)
|
||
}
|
||
|
||
export default App
|
||
```
|
||
|
||
## 插槽
|
||
|
||
通过`props.children`接收插槽的内容
|
||
|
||
通过`props.chlaName`和模板字符串 合并类名
|
||
|
||
```js
|
||
import React from 'react'
|
||
import './card.css'
|
||
|
||
const Card = props => {
|
||
return (
|
||
<div className={`card${props.className ? ' ' + props.className : ''}`}>>{props.children}</div>
|
||
)
|
||
}
|
||
|
||
export default Card
|
||
```
|
||
|
||
## 双向绑定
|
||
|
||
> 页面 <<==> > 数据
|
||
|
||
* 用`useState` 初始化值, 把`state`绑定到 input 的 value 上
|
||
* 当 input 发生变化的时候, 通过`setState`更新 state
|
||
* 当 state 发生变化的时候, 触发重新渲染. 例如格式化 state 为初始值, input 的内容重新渲染为空
|
||
|
||
```js
|
||
import { useState } from 'react'
|
||
|
||
const NoteForm = () => {
|
||
// 表单初始数据
|
||
const [formData, setFormData] = useState({
|
||
date: '',
|
||
desc: '',
|
||
time: '',
|
||
})
|
||
|
||
// 更新表单数据
|
||
const inputChangeHandler = e => {
|
||
setFormData(prev => {
|
||
return { ...prev, [e.target.id]: e.target.value }
|
||
})
|
||
}
|
||
|
||
const formSubmitHandler = e => {
|
||
e.preventDefault() // 阻止表单默认行为
|
||
// todo 校验表单
|
||
// todo 提交表单
|
||
const formDataFormat = {
|
||
data: Date.parse(new Date(formData.date)),
|
||
desc: formData.desc,
|
||
time: +formData.time,
|
||
}
|
||
console.log('提交表单', formDataFormat)
|
||
setFormData(() => ({
|
||
date: '',
|
||
desc: '',
|
||
time: '',
|
||
}))
|
||
}
|
||
|
||
return (
|
||
<div className="note-form">
|
||
<form onSubmit={formSubmitHandler}>
|
||
<div className="form-item">
|
||
<label htmlFor="date">日期:</label>
|
||
<input
|
||
type="date"
|
||
name="date"
|
||
id="date"
|
||
onChange={inputChangeHandler}
|
||
value={formData.date}
|
||
/>
|
||
</div>
|
||
<div className="form-item">
|
||
<label htmlFor="desc">内容:</label>
|
||
<input
|
||
type="text"
|
||
name="desc"
|
||
id="desc"
|
||
autoComplete="off"
|
||
onChange={inputChangeHandler}
|
||
value={formData.desc}
|
||
/>
|
||
</div>
|
||
<div className="form-item">
|
||
<label htmlFor="time">时长:</label>
|
||
<input
|
||
type="number"
|
||
name="time"
|
||
id="time"
|
||
onChange={inputChangeHandler}
|
||
value={formData.time}
|
||
/>
|
||
</div>
|
||
<button className="form-btn">添加</button>
|
||
</form>
|
||
</div>
|
||
)
|
||
}
|
||
|
||
export default NoteForm
|
||
```
|
||
|
||
## 子传父: props 中传函数, 子组件中调用
|
||
|
||
* 把更新数据的函数绑定到标签的`onXxx`属性上
|
||
* 子组件同样通过`props`形参接受所有父组件传递的数据
|
||
* 子组件通过`props.onXxx(newValue)`向父组件的更新函数传递新数据
|
||
* 父组件的更新函数被调用, 拿到新的数据, 通过 setState 更新数据(作用域在父组件中)
|
||
|
||
## portal 传送门
|
||
|
||
> 可以将子节点渲染到存在于父组件以外的 DOM 节点
|
||
>
|
||
> 例如: 子组件弹全局提示窗
|
||
|
||
```js
|
||
// 1.在index.html需要的位置添加标签
|
||
// <div id="backdrop-root"></div>
|
||
|
||
// 2. 修改组件的渲染方式
|
||
// 2.1 import ReactDOM from 'react-dom'
|
||
// 2.2 通过ReactDOM.createPortal()作为返回值创建元素
|
||
// 参数: 1.jsx
|
||
// 2.DOM元素, 可以通过document.getElementById('backdrop-root')获取
|
||
```
|
||
|
||
## Fragment
|
||
|
||
jsx 中要求虚拟 dom 有根标签, 但实际中不想增加一个没用的 div
|
||
|
||
```jsx
|
||
import {Fragment} from 'React'
|
||
// ...
|
||
<Fragment>
|
||
<div>1</div>
|
||
<div>2</div>
|
||
<div>3</div>
|
||
<Fragment>
|
||
```
|
||
|
||
```js
|
||
// 甚至提供了语法糖, 不用引入, 直接用空标签
|
||
<>
|
||
<div>1</div>
|
||
<div>2</div>
|
||
<div>3</div>
|
||
</>
|
||
```
|
||
|
||
相当于创建一个空白的组件
|
||
|
||
```js
|
||
const Fragment = props => {
|
||
return props.children
|
||
}
|
||
|
||
export default Fragment
|
||
```
|
||
|
||
然后用来当容器
|
||
|
||
```js
|
||
import Fragment from './Fragment.js'
|
||
|
||
const Test = () => {
|
||
return (
|
||
<Fragment>
|
||
<div>1</div>
|
||
<div>2</div>
|
||
</Fragment>
|
||
)
|
||
}
|
||
|
||
export default Test
|
||
```
|
||
|
||
## React 中的 css
|
||
|
||
* 在 jsx 中使用内联样式: `style={\{key:value\}}`
|
||
* 外联样式表: import 导入`.css`, 通过 `className`控制, 没有作用域, 全局作用
|
||
* css 模块:
|
||
|
||
1. 创建`xxx.module.css`
|
||
2. `import xx form './xxx.module.css' `
|
||
3. jsx 中, `className={xx.p1}`, xx 是模块名, p1 是 css 模块文件中的类名
|
||
|
||
好处:
|
||
|
||
p1 这些 class 并不是最终实际的 class, react 会自动生成唯一的 class
|
||
|
||
## 移动端适配
|
||
|
||
```js
|
||
// 移动端适配
|
||
// 常见设计稿750px * 1340px
|
||
// 1px/750px * 100vw, 750对应设计稿宽度,分成750份,把1份的大小当成根字体大小
|
||
document.documentElement.style.fontSize = 100/750 + 'vw'
|
||
```
|
||
|
||
```js
|
||
// 移动端适配
|
||
const autoResize = ()=>{
|
||
const devicewidth = document.documentElement.clientWidth
|
||
// 常见设计稿750px * 1340px
|
||
if(devicewidth>750){
|
||
document.documentElement.style.fontSize = '1px'
|
||
}else{
|
||
// 1px/750px * 100vw, 750对应设计稿宽度,分成750份,把1份的大小当成根字体大小
|
||
document.documentElement.style.fontSize = 100/750 + 'vw'
|
||
}
|
||
}
|
||
autoResize()
|
||
let timeId = ''
|
||
window.onresize = ()=>{
|
||
timeId = setTimeout(() => {
|
||
clearTimeout(timeId)
|
||
autoResize()
|
||
}, 500);
|
||
}
|
||
```
|
||
|
||
## Context useContext
|
||
|
||
不再限制于 props 一层层传递数据, 在外层统一设置, 在内层所有组件都可以访问到
|
||
|
||
```js
|
||
/**
|
||
定义:React.createContext(), 一般不使用初始值
|
||
*/
|
||
import React from 'react'
|
||
const TestContext = React.createContext({ name: 'Tom', age: 18 })
|
||
export default TestContext
|
||
```
|
||
|
||
```js
|
||
/**
|
||
数据生产:xx.provider标签通过value定义数据
|
||
context有就近原则,<B/>的数据生产者是最近的一层context
|
||
*/
|
||
import TestContext from 'xxx'
|
||
|
||
const Xx = ()=>{
|
||
<TestContext.provider value={{name: 'Jane', age: 19}}>
|
||
<A/>
|
||
<TestContext.provider value={{name: 'July', age: 17}}
|
||
<B/>
|
||
<TestContext.provider/>
|
||
<TestContext.provider/>
|
||
}
|
||
```
|
||
|
||
```js
|
||
/**
|
||
数据消费: 使用钩子 useContext
|
||
*/
|
||
import TestContext from 'xxx'
|
||
|
||
const A = ()=>{
|
||
const ctx = useContext(TestContext)
|
||
|
||
return <div>name: {ctx.name} - age: {ctx.age}<div>
|
||
}
|
||
export default A
|
||
```
|
||
|
||
## 副作用Effect
|
||
|
||
有部分逻辑直接写在函数体中,会影响组件的渲染,这部分代码会产生"副作用"。(例如修改 state 写到组件中,可能导致死循环渲染)
|
||
|
||
### React.StrictMode
|
||
|
||
React 的严格模式,在开发模式下,会主动重复调用一些函数,以使副作用凸显。所以在开发模式且开启严格模式,这些函数会被调用两次:
|
||
|
||
* 函数组件的函数体
|
||
* 参数为函数的`setState`
|
||
* 参数为函数的`useState`、`useMemo`、`useReducer`
|
||
|
||
### 重渲染案例
|
||
|
||
```jsx
|
||
import { useState } from 'react'
|
||
import B from './components/B.jsx'
|
||
|
||
function App() {
|
||
console.log('重渲染')
|
||
const [count, setCount] = useState(0)
|
||
// setCount(0)
|
||
// 直接在函数体中调用setState, Too many re-renders
|
||
/** 为什么初始值和新值一样,还会触发重渲染?
|
||
* setState()的执行流程(函数组件)
|
||
* setCount() --> dispatchSetData()
|
||
* 会先判断当前组件处于什么阶段
|
||
* 1. 渲染阶段: 不会检查state值是否相同
|
||
* 2. 非渲染阶段: 会检查state是否相同
|
||
* 2.1 不相同, 进行渲染
|
||
* 2.3 相同,不渲染
|
||
*
|
||
* */
|
||
|
||
/** 为什么初始值0, 第二次点按钮会重渲染, 第三次才不会重渲染
|
||
* 0 ----> 1 ----> 1 --> 1
|
||
* 打印 打印
|
||
* 非渲染阶段值相同: 在一些情况下会继续执行当前组件的重渲染, 但不会触发子组件的渲染, 且这次渲染不会产生实际的效果(通常发生在第一次相同)
|
||
*
|
||
*/
|
||
|
||
return (
|
||
<div className="App">
|
||
<button onClick={() => setCount(1)}>count is {count}</button>
|
||
|
||
<B />
|
||
</div>
|
||
)
|
||
}
|
||
|
||
export default App
|
||
```
|
||
|
||
```jsx
|
||
<!--B.jsx-->
|
||
import React from 'react';
|
||
|
||
function B(props) {
|
||
console.log('B组件重新渲染');
|
||
return (
|
||
<div>
|
||
我是子组件
|
||
</div>
|
||
);
|
||
}
|
||
|
||
export default B;
|
||
```
|
||
|
||
### useEffect
|
||
|
||
> 将会产生副作用的函数写在useEffect的回调函数里
|
||
|
||
```js
|
||
useEffect(() => setCount(0))
|
||
/** useEffect(fn, [])
|
||
* fn作为第一个参数的函数将在组件渲染完成后执行
|
||
* 第二个可选参数是依赖项,只有依赖项发生变化,才执行. 数组中包含了**所有**外部作用域中会发生变化且在 effect 中使用的变量
|
||
* useState创建的setState在每次渲染获取都是相同的,写不写没关系
|
||
* 如果传空数组[], effect只会在初始化时触发一次
|
||
*/
|
||
```
|
||
|
||
### 清除 effect
|
||
|
||
```js
|
||
useEffect(() => {
|
||
// 防抖
|
||
const timeId = setTimeout(() => {
|
||
props.onSearch(keyword)
|
||
}, 1000)
|
||
return () => {
|
||
// 下次effect执行, 可以用来清理上次effect的影响
|
||
clearTimeout(timeId)
|
||
}
|
||
}, [keyword])
|
||
// return 返回一个清除函数, 在下次effect先执行
|
||
```
|
||
|
||
## useReducer
|
||
|
||
> useState 的替代方案
|
||
>
|
||
> 当 state 过于复杂时, 使用 useReducer 进行整合
|
||
|
||
```js
|
||
/** useReducer(reducer, initialArg, init)
|
||
* reducer: 整合函数
|
||
* 对state的所有操作都应该在该函数中定义
|
||
* 该函数的返回值, 会成为state的新值
|
||
* reducer执行时会收到两个参数:
|
||
* 第一个参数: 当前state最新的值
|
||
* 第二个参数: action: 对象, 从countDispatch 传进来的值
|
||
* 为了避免每次渲染都重新创建reducer,一般写在函数组件外面
|
||
* initialArg: state的初始值, 作用和uueState()中的值一样
|
||
* init: 函数, 可选参数, 惰性初始化, 初始state就由它决定,而不再是第二个参数
|
||
* @return
|
||
* 数组:
|
||
* 第一个参数: state
|
||
* 第二个参数: state 修改的派发器
|
||
* 具体通过reducer执行
|
||
*/
|
||
```
|
||
|
||
```jsx
|
||
import { useState, useReducer } from 'react'
|
||
import './App.css'
|
||
|
||
const initCounter = () => {
|
||
return 10
|
||
}
|
||
|
||
const countReducer = (state, action) => {
|
||
switch (action.type) {
|
||
case 'add':
|
||
return state + 1
|
||
case 'sub':
|
||
return state - 1
|
||
default:
|
||
return state
|
||
}
|
||
}
|
||
|
||
function App() {
|
||
// useState的写法
|
||
// const [count, setCount] = useState(0)
|
||
// const addHandler = ()=>{
|
||
// setCount(prev=>prev+1)
|
||
// }
|
||
// const subHandler = ()=>{
|
||
// setCount(prev=>prev-1)
|
||
// }
|
||
|
||
// 改用useReducer
|
||
// const [count,countDispatch] = useReducer(countReducer, 1)
|
||
const [count, countDispatch] = useReducer(countReducer, 1, initCounter)
|
||
|
||
const addHandler = () => {
|
||
countDispatch({ type: 'add' })
|
||
}
|
||
const subHandler = () => {
|
||
countDispatch({ type: 'sub' })
|
||
}
|
||
|
||
return (
|
||
<div className="App">
|
||
<div className="card">
|
||
count is {count}
|
||
<div>
|
||
<button onClick={addHandler}>增加</button>
|
||
<button onClick={subHandler}>减少</button>
|
||
</div>
|
||
</div>
|
||
</div>
|
||
)
|
||
}
|
||
|
||
export default App
|
||
```
|
||
|
||
## React.memo
|
||
|
||
React 组件会在两种情况下重新渲染
|
||
|
||
1. 组件自身的 state 发生变化
|
||
2. 组件的父组件重新渲染
|
||
|
||
如果子组件的 state 并没有发生变化, 但父组件重新渲染导致子组件也重新渲染, 为了减少性能损失, 可以用`React.memo()`
|
||
|
||
```js
|
||
/**
|
||
* React.memo()是高阶组件
|
||
* 接收另一个组件作为参数,返回一个包装后的新组件
|
||
* 包装后的新组件具有缓存功能
|
||
* 只有组件的props发生变化,才会触发组件的重新渲染,否则总是返回缓存中的结果
|
||
*/
|
||
```
|
||
|
||
```jsx
|
||
import { useState } from 'react'
|
||
import './App.css'
|
||
import B from './components/B'
|
||
import C from './components/C'
|
||
|
||
function App() {
|
||
console.log('A组件重渲染')
|
||
const [count, setCount] = useState(0)
|
||
|
||
return (
|
||
<div className="App">
|
||
<button onClick={() => setCount(count => count + 1)}>count is {count}</button>
|
||
<B />
|
||
<C count={count} />
|
||
</div>
|
||
)
|
||
}
|
||
|
||
export default App
|
||
```
|
||
|
||
```jsx
|
||
import React from 'react'
|
||
|
||
const B = () => {
|
||
console.log('B组件重渲染')
|
||
s
|
||
return <div>B组件</div>
|
||
}
|
||
|
||
export default React.memo(B)
|
||
```
|
||
|
||
```jsx
|
||
import React from 'react'
|
||
|
||
const C = props => {
|
||
console.log('C组件重新渲染')
|
||
return <div>props传过来的count: {props.count}</div>
|
||
}
|
||
|
||
export default React.memo(C)
|
||
```
|
||
|
||
## useCalkback
|
||
|
||
```js
|
||
/**
|
||
* useCallback()
|
||
* 钩子函数,用来创建React中的回调函数
|
||
* 创建的回调函数可以在组件重新渲染时不重新创建
|
||
* 参数:
|
||
* 1.回调函数
|
||
* 2.依赖数组
|
||
* - 当依赖数组中的变量发生变化时,回调函数才会重新创建
|
||
* - 如果不指定依赖数组(不传),回调函数每次都会重新创建
|
||
* - 一定要把回调函数用到的变量都放到数组里, 除了setState
|
||
* 不放的话,变量的作用域只会停留在第一次创建的时候
|
||
*/
|
||
```
|
||
|
||
```jsx
|
||
import { useCallback } from 'react'
|
||
import { useState } from 'react'
|
||
import './App.css'
|
||
import B from './components/B'
|
||
import C from './components/C'
|
||
import D from './components/D'
|
||
import E from './components/E'
|
||
|
||
function App() {
|
||
console.log('A组件重渲染')
|
||
|
||
const [count, setCount] = useState(0)
|
||
const [num, setNum] = useState(1)
|
||
|
||
const addCount = () => {
|
||
setCount(prev => prev + 1)
|
||
}
|
||
|
||
/**
|
||
* useCallback()
|
||
*/
|
||
const addCount2 = useCallback(() => {
|
||
setCount(prev => prev + 1)
|
||
}, [])
|
||
|
||
const cAddN = useCallback(() => {
|
||
setCount(prev => prev + num)
|
||
setNum(prev => prev + 1)
|
||
}, [])
|
||
/**
|
||
* 没有收集num,num固定是第一次的1
|
||
*/
|
||
|
||
const cAddN2 = useCallback(() => {
|
||
setCount(prev => prev + num)
|
||
setNum(prev => prev + 1)
|
||
}, [num])
|
||
/**
|
||
* num放到依赖数组,num的作用域会跟着变化
|
||
*/
|
||
|
||
return (
|
||
<div className="App">
|
||
<div>
|
||
<div>count is {count}</div>
|
||
<div>num is {num}</div>
|
||
</div>
|
||
<B addCount={addCount} />
|
||
<C addCount={addCount2} />
|
||
<D cAddN={cAddN} />
|
||
<E cAddN2={cAddN2} />
|
||
</div>
|
||
)
|
||
}
|
||
|
||
export default App
|
||
```
|
||
|
||
```jsx
|
||
import React from 'react'
|
||
|
||
const B = props => {
|
||
console.log('B组件重渲染')
|
||
return (
|
||
<div>
|
||
B组件
|
||
<button onClick={props.addCount}>+</button>
|
||
</div>
|
||
)
|
||
}
|
||
|
||
export default React.memo(B)
|
||
/**
|
||
* B组件也重新渲染: props里的addCount在A组件重新渲染后重新创建
|
||
*/
|
||
```
|
||
|
||
```jsx
|
||
import React from 'react'
|
||
|
||
const C = props => {
|
||
console.log('C组件重渲染')
|
||
return (
|
||
<div>
|
||
<hr />
|
||
C组件
|
||
<div>
|
||
回调使用useCallback
|
||
<button onClick={props.addCount}>count+1</button>
|
||
</div>
|
||
</div>
|
||
)
|
||
}
|
||
|
||
export default React.memo(C)
|
||
```
|
||
|
||
```jsx
|
||
import React from 'react'
|
||
|
||
const D = props => {
|
||
console.log('D组件重渲染')
|
||
return (
|
||
<div>
|
||
<hr />
|
||
D组件
|
||
<div>
|
||
变量没有放到依赖数组
|
||
<button onClick={props.cAddN}>count=count+num</button>
|
||
</div>
|
||
</div>
|
||
)
|
||
}
|
||
|
||
export default React.memo(D)
|
||
```
|
||
|
||
```jsx
|
||
import React from 'react'
|
||
|
||
const E = props => {
|
||
console.log('E组件重渲染')
|
||
return (
|
||
<div>
|
||
<hr />
|
||
E组件
|
||
<div>
|
||
变量放到依赖数组
|
||
<button onClick={props.cAddN2}>count=count+num</button>
|
||
</div>
|
||
</div>
|
||
)
|
||
}
|
||
|
||
export default React.memo(E)
|
||
```
|
||
|
||
## hooks
|
||
|
||
> React 中的钩子只能在函数组件或者自定义钩子中调用
|
||
>
|
||
> 自定义钩子: 本质就是普通函数, 命名上以 use 开头
|
||
|
||
例子: useFetch
|
||
|
||
```js
|
||
import {useState} from "react"
|
||
const baseURL = import.meta.env.VITE_HOST
|
||
|
||
const useFetch = ({url,type='GET',headers,successCallback,errorCallback}) => {
|
||
const [loading, setLoading] = useState(false)
|
||
const fetchInit = {
|
||
method: type,
|
||
headers: headers || {
|
||
'Content-Type': 'application/json',
|
||
}
|
||
}
|
||
const fetchData = async (body)=>{
|
||
if (loading) {
|
||
console.log('等待服务器响应,请勿重复提交!')
|
||
return
|
||
} else {
|
||
setLoading(true)
|
||
}
|
||
try {
|
||
if(!!body) {
|
||
fetchInit.body = JSON.stringify(body)
|
||
}
|
||
const res = await fetch(baseURL+'/api/'+url, fetchInit)
|
||
if (res.statusText === 'OK') {
|
||
const resData = await res.json()
|
||
successCallback && successCallback(resData)
|
||
} else {
|
||
errorCallback && errorCallback()
|
||
throw new Error(res.statusText)
|
||
}
|
||
} catch (error) {
|
||
console.log(error.message)
|
||
} finally {
|
||
setLoading(false)
|
||
}
|
||
}
|
||
|
||
return {
|
||
loading,
|
||
setLoading,
|
||
fetchData
|
||
}
|
||
}
|
||
|
||
export default useFetch
|
||
```
|
||
|
||
使用
|
||
|
||
```js
|
||
import useFetch from '@/hooks/useFetch'
|
||
|
||
// 在函数组件中
|
||
//...
|
||
// 修改学生/添加学生
|
||
const { loading: updateLoading, fetchData: updateStu } = useFetch({
|
||
url: props.stu ? 'students/' + props.stu?.id : '/students',
|
||
type: props.stu ? 'PUT' : 'POST',
|
||
successCallback: ctx.fetchStuList,
|
||
})
|
||
const submitHandler = () => {
|
||
if (checkStu(stu) == false) {
|
||
console.log('检查输入')s
|
||
return
|
||
}
|
||
updateStu({ data: stu })
|
||
}
|
||
//...
|
||
```
|
||
|
||
## useMemo
|
||
|
||
```js
|
||
const memoizedValue = useMemo(() => computeExpensiveValue(a, b), [a, b]);
|
||
```
|
||
|
||
把"创建"函数和依赖项数组作为参数传入 `useMemo`,它仅会在某个依赖项改变时才重新计算 memoized 值。这种优化有助于避免在每次渲染时都进行高开销的计算。
|
||
|
||
传入 `useMemo` 的函数会在渲染期间执行。不要在这个函数内部执行不应该在渲染期间内执行的操作,诸如副作用这类的操作属于 `useEffect` 的适用范畴,而不是 `useMemo`。
|
||
|
||
`useMemo` 缓存的是函数的执行结果, `useCallbakc` 缓存的是函数, `React.memo` 是在子组件中使用
|
||
|
||
`useMemo` 也可以用来缓存 jsx/组件
|
||
|
||
如果没有提供依赖项数组,`useMemo` 在每次渲染时都会计算新的值。
|
||
|
||
```jsx
|
||
import { useState, useMemo } from 'react'
|
||
|
||
const sum = (a, b) => {
|
||
console.log('执行求和代码了')
|
||
const time = Date.now()
|
||
while (true) {
|
||
// 模拟逻辑特别复杂的代码
|
||
if (Date.now() - time > 2000) {
|
||
break
|
||
}
|
||
}
|
||
return a + b
|
||
}
|
||
|
||
const App = () => {
|
||
const [count, setCount] = useState(0)
|
||
|
||
// const num = sum(123,456)
|
||
// 缓存的是函数的执行结果
|
||
const num = useMemo(() => {
|
||
return sum(123, 456)
|
||
}, [])
|
||
|
||
return (
|
||
<div className="App">
|
||
<p>sum:{num}</p>
|
||
<p>count:{count}</p>
|
||
<button
|
||
onClick={() => {
|
||
setCount(prev => prev + 1)
|
||
}}>
|
||
+1
|
||
</button>
|
||
</div>
|
||
)
|
||
}
|
||
|
||
export default App
|
||
|
||
```
|
||
|
||
## useImperativeHandle
|
||
|
||
```js
|
||
// 无法直接获取react组件的dom对象
|
||
// 例如 cont myref = useRef()
|
||
// <Child ref={myref} />
|
||
// 这样是获取不到的
|
||
|
||
// 用React.forwardRef()把组件包起来
|
||
// useImperativeHandle()自定义要返回的ref
|
||
|
||
// 把子组件的东西暴露给父组件,但不是直接暴露dom给父组件操作, 而是可以控制要暴露哪些值或方法
|
||
```
|
||
|
||
```js
|
||
useImperativeHandle(ref, createHandle, [deps])
|
||
```
|
||
|
||
```jsx
|
||
// 子组件
|
||
import { useState,useImperativeHandle } from 'react'
|
||
import React from 'react'
|
||
|
||
// 多了第二个参数ref
|
||
const Child = (props,ref) => {
|
||
const [inpuValue, setInputValue] = useState('')
|
||
const inputChangeHandler = (e)=>{
|
||
setInputValue(+e.target.value)
|
||
}
|
||
useImperativeHandle(ref,()=>{
|
||
// 决定要暴露哪些给父组件, 这里暴露了值和修改值的方法, 而不是直接暴露dom给父组件修改
|
||
return {
|
||
setInputValue,
|
||
value: inpuValue
|
||
}
|
||
})
|
||
return (
|
||
<input type='value' value={inpuValue} onChange={inputChangeHandler}/>
|
||
)
|
||
}
|
||
|
||
export default React.forwardRef(Child)
|
||
```
|
||
|
||
```jsx
|
||
import { useRef } from 'react'
|
||
import Child from './components/Child'
|
||
|
||
const App = () => {
|
||
const childRef = useRef()
|
||
|
||
return (
|
||
<div className="App">
|
||
<button
|
||
onClick={() => {
|
||
console.log('childRef',childRef)
|
||
// 只能通过暴露出来的方法修改子组件
|
||
childRef.current.setInputValue(childRef.current.value+1)
|
||
}}>
|
||
Child_input+1
|
||
</button>
|
||
<Child ref={childRef}/>
|
||
</div>
|
||
)
|
||
}
|
||
|
||
export default App
|
||
```
|
||
|
||
## useLayoutEffect
|
||
|
||
```mermaid
|
||
flowchart TB
|
||
%%classDef
|
||
classDef Purpule fill:#682b93,color:white;
|
||
classDef Blue fill:#3b67b9,color:white;
|
||
|
||
subgraph useInsertionEffect
|
||
direction TB
|
||
1[组件挂载]-->2[state改变]-->3[useInsertionEffect]-->4[DOM改变]-->5[绘制屏幕]
|
||
end
|
||
|
||
subgraph useLayoutEffect
|
||
direction TB
|
||
A[组件挂载]-->B[state改变]-->C[DOM改变]-->D[useLayoutEffect]-->E[绘制屏幕]
|
||
end
|
||
|
||
subgraph useEffect
|
||
direction TB
|
||
a[组件挂载]-->b[state改变]-->c[DOM改变]-->d[绘制屏幕]-->e[useEffect]
|
||
end
|
||
|
||
%%Style
|
||
class d,5,E Purpule;
|
||
class e,3,D Blue;
|
||
```
|
||
|
||
useLayoutEffect 的方法签名和 useEffect 一样,功能也类似。不同点在于,useLayoutEffect 的执行时机要早于 useEffect,它会在 DOM 改变后调用。在老版本的 React 中它和 useEffect 的区别比较好演示,React 18中,useEffect 的运行方式有所变化,所以二者区别不好演示。
|
||
|
||
uselayoutEffect 使用场景不多,实际开发中,在 effect 中需要修改元素样式,且使用 useEffect 会出现闪灯现象时可以使用 uselayoutEffect 进行昔换。
|
||
|
||
useInsertionEffect 场景: 用来设置动态样式, 在性能上减少重渲染和 dom 操作
|
||
|
||
```js
|
||
import { useRef,useLayoutEffect,useEffect,useInsertionEffect } from 'react'
|
||
|
||
const App = () => {
|
||
const myRef = useRef()
|
||
useEffect(() => {
|
||
console.log('useEffect', myRef) // 3.屏幕渲染之后,可能有白屏
|
||
})
|
||
useLayoutEffect(() => {
|
||
console.log('useLayoutEffect', myRef) // 2.屏幕渲染之前
|
||
})
|
||
useInsertionEffect(() => {
|
||
console.log('useInsertionEffect', myRef) // 1. undefined
|
||
})
|
||
|
||
return (
|
||
<div className="App">
|
||
<div ref={myRef}>123</div>
|
||
</div>
|
||
)
|
||
}
|
||
|
||
export default App
|
||
```
|
||
|
||
## useDebugValue
|
||
|
||
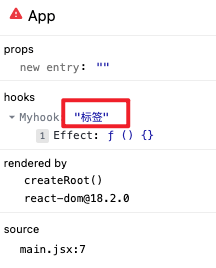
可以用来给钩子打标签, 开发者插件中可以看到
|
||
|
||
```js
|
||
// 自定义勾子
|
||
import { useEffect,useDebugValue } from 'react'
|
||
|
||
const useMyhook = () => {
|
||
useDebugValue('标签')
|
||
useEffect(()=>{
|
||
console.log('自定义钩子')
|
||
})
|
||
}
|
||
|
||
export default useMyhook
|
||
```
|
||
|
||
|
||
|
||
## useDeferredValue
|
||
|
||
设置一个延迟的 state
|
||
|
||
```js
|
||
/**
|
||
* 当多个组件使用同一个state时, 组件可能相互影响
|
||
* 一个组件卡顿,导致所有组件卡顿
|
||
* 此时设置延迟值,传给卡顿的组件,快的组件就不用等卡顿的组件了
|
||
* 实际体验: 快速改动value,触发deffredValue快速变化, <List />重渲染还是卡
|
||
*/
|
||
```
|
||
|
||
```jsx
|
||
// 模拟卡顿的组件
|
||
import React from 'react'
|
||
|
||
const items = []
|
||
for (let index = 0; index < 30; index++) {
|
||
items.push(`商品序号${index + 1}`)
|
||
}
|
||
|
||
const List = props => {
|
||
const filterList = (() => {
|
||
if (props.keyWord) {
|
||
return items.filter(item => {
|
||
return item.indexOf(props.keyWord) !== -1
|
||
})
|
||
} else {
|
||
return items
|
||
}
|
||
})()
|
||
|
||
// 模拟能卡的组件
|
||
const begin = Date.now()
|
||
while(true){
|
||
if(Date.now() - begin > 3000){
|
||
break
|
||
}
|
||
}
|
||
|
||
return (
|
||
<ul>
|
||
{filterList.map(item => {
|
||
return <li key={item.substr(3)}>{item}</li>
|
||
})}
|
||
</ul>
|
||
)
|
||
}
|
||
|
||
export default React.memo(List)
|
||
```
|
||
|
||
```jsx
|
||
import { useDeferredValue } from 'react'
|
||
import { useState } from 'react'
|
||
import List from './components/List'
|
||
|
||
const App = () => {
|
||
console.log('组件重新渲染了')
|
||
const [value, setValue] = useState(0)
|
||
// useDeferredValue需要一个state作为参数
|
||
// 设置了延迟后, 每次修改state都会触发两次渲染
|
||
// 第一次'延迟值'是旧值, 第二次延迟值'是新值
|
||
// 延迟值总比原state慢
|
||
|
||
const deffredValue = useDeferredValue(value)
|
||
console.log('value', value)
|
||
console.log('deffredValue', deffredValue)
|
||
|
||
// 组件重新渲染了
|
||
// value 1
|
||
// deffredValue 0
|
||
// 组件重新渲染了
|
||
// value 1
|
||
// deffredValue 1
|
||
/**
|
||
* 当多个组件使用同一个state时, 组件可能相互影响
|
||
* 一个组件卡顿,导致所有组件卡顿
|
||
* 此时设置延迟值,传给卡顿的组件,快的组件就不用等卡顿的组件了
|
||
* 实际体验: 快速改动value,触发deffredValue快速变化, <List />重渲染还是卡
|
||
*/
|
||
|
||
return (
|
||
<div className="App">
|
||
<input
|
||
type="text"
|
||
value={value}
|
||
onChange={e => {
|
||
setValue(e.target.value)
|
||
}}
|
||
/>
|
||
{/* <List keyWord={value}/> */}
|
||
<List keyWord={deffredValue} />
|
||
</div>
|
||
)
|
||
}
|
||
|
||
export default App
|
||
|
||
```
|
||
|
||
## useTransition
|
||
|
||
让某个 setState 比其他的 setState 更慢执行
|
||
|
||
```js
|
||
// 模拟性能很差的组件
|
||
import React from 'react'
|
||
|
||
const items = []
|
||
for (let index = 0; index < 30; index++) {
|
||
items.push(`商品序号${index + 1}`)
|
||
}
|
||
|
||
const List = props => {
|
||
const filterList = (() => {
|
||
if (props.keyWord) {
|
||
return items.filter(item => {
|
||
return item.indexOf(props.keyWord) !== -1
|
||
})
|
||
} else {
|
||
return items
|
||
}
|
||
})()
|
||
|
||
// 模拟能卡的组件
|
||
const begin = Date.now()
|
||
while(true){
|
||
if(Date.now() - begin > 3000){
|
||
break
|
||
}
|
||
}
|
||
|
||
return (
|
||
<ul>
|
||
{filterList.map(item => {
|
||
return <li key={item.substr(3)}>{item}</li>
|
||
})}
|
||
</ul>
|
||
)
|
||
}
|
||
|
||
export default React.memo(List)
|
||
|
||
```
|
||
|
||
```jsx
|
||
import { useTransition } from 'react'
|
||
import { useState } from 'react'
|
||
import List from './components/List'
|
||
|
||
const App = () => {
|
||
console.log('重新渲染')
|
||
const [value, setValue] = useState('')
|
||
const [keyWord, setKeyWord] = useState('')
|
||
|
||
// isPending可以获取startTransition的状态
|
||
const [isPending, startTransition] = useTransition()
|
||
|
||
const changeHandler = e => {
|
||
setValue(e.target.value)
|
||
// startTransition的回调函数中的setState会在其他的setState都生效后才执行
|
||
startTransition(() => {
|
||
setKeyWord(e.target.value)
|
||
})
|
||
}
|
||
return (
|
||
<div className="App">
|
||
<input type="text" value={value} onChange={changeHandler} />
|
||
{!isPending && <List keyWord={keyWord} />}
|
||
</div>
|
||
)
|
||
}
|
||
|
||
export default App
|
||
|
||
```
|
||
|
||
useDeferredValue 和 useTransition 都代替不了节流防抖 |